一、前言
最近有小朋友在学习spring boot的时候遇到了一个问题,按照教程上操作始终是404.于是就百事不得其解.问我的时候,我也一脸蒙B,毕竟jsp这玩意儿好久都没碰到过了,之前碰jsp的时候还是在ssh的时候.
既然遇到问题就来分析一下呗,趁着最近在看spring的源码.
二、案发现场
ymal:
server:
  port: 9090
spring:
  mvc:
    view:
      prefix: /WEB-INF/jsp/
      suffix: .jsp
pom:
 <dependencies>
        <dependency>
            <groupId>org.springframework.boot</groupId>
            <artifactId>spring-boot-starter-aop</artifactId>
        </dependency>
        <dependency>
            <groupId>org.springframework.boot</groupId>
            <artifactId>spring-boot-starter-web</artifactId>
        </dependency>
        <dependency>
            <groupId>org.springframework.boot</groupId>
            <artifactId>spring-boot-starter-test</artifactId>
            <scope>test</scope>
        </dependency>
        <dependency>
            <groupId>org.apache.tomcat.embed</groupId>
            <artifactId>tomcat-embed-jasper</artifactId>
        </dependency>
        <dependency>
            <groupId>org.springframework.boot</groupId>
            <artifactId>spring-boot-starter-tomcat</artifactId>
        </dependency>
        <dependency>
            <groupId>javax.servlet</groupId>
            <artifactId>jstl</artifactId>
        </dependency>
    </dependencies>

    <build>
        <plugins>
            <plugin>
                <groupId>org.springframework.boot</groupId>
                <artifactId>spring-boot-maven-plugin</artifactId>
            </plugin>
        </plugins>

    </build>
代码:
@Controller
@EnableAutoConfiguration
public class App {

    public static void main(String[] args) {
        SpringApplication.run(App.class,args);
    }

    @RequestMapping("/test")
    public String test(){
        return "index";
    }

}
按照以上代码,应该是没有什么问题的,毕竟人家的教程也是这么做的,只不过别人是用eclipse,他是用的idea罢了.我也懒得去分析为啥eclipse没得问题了,直接来看看为啥会有这个问题.
三、分析
众所周知,spring boot只是在spring上面包了一层皮,里面还是利用了spring的一些机制来完成,当然加载自动化配置,开箱即用,感觉很智能.
springboot为我们开发者省去了很多配置上的麻烦,大部分都默认配置好了,但是虽然便利了开发者,但也带来了一些麻烦,就如这个问题,整个日子输出窗口都没有日志显示为啥会是404,文件明明在那,为啥会找不到呢?
要解决这个问题,就要从springBoot的自动配置上入手.按照上面的配置,用的是嵌入式的tomcat,那么就从tomcat的配置开始.
3.1 ServletWebServerFactoryConfiguration
当使用springboot的wen功能的时候,有个关键的配置就避免不了了,代码如下:
@Configuration(proxyBeanMethods = false)
class ServletWebServerFactoryConfiguration {

		// 判断classpath是否存在 Servlet,Tomcat,UpgradeProtocol类
   // 如果存在就启用此配置
   // 当然还要 ServletWebServerFactory 期子类没有 在容器中
   @Configuration(proxyBeanMethods = false)
   @ConditionalOnClass({ Servlet.class, Tomcat.class, UpgradeProtocol.class })
   @ConditionalOnMissingBean(value = ServletWebServerFactory.class, search = SearchStrategy.CURRENT)
   static class EmbeddedTomcat {

      @Bean
      TomcatServletWebServerFactory tomcatServletWebServerFactory(
            ObjectProvider<TomcatConnectorCustomizer> connectorCustomizers,
            ObjectProvider<TomcatContextCustomizer> contextCustomizers,
            ObjectProvider<TomcatProtocolHandlerCustomizer<?>> protocolHandlerCustomizers) {
         // 创建tomcat 工厂
         TomcatServletWebServerFactory factory = new TomcatServletWebServerFactory();
         factory.getTomcatConnectorCustomizers()
               .addAll(connectorCustomizers.orderedStream().collect(Collectors.toList()));
         factory.getTomcatContextCustomizers()
               .addAll(contextCustomizers.orderedStream().collect(Collectors.toList()));
         factory.getTomcatProtocolHandlerCustomizers()
               .addAll(protocolHandlerCustomizers.orderedStream().collect(Collectors.toList()));
         return factory;
      }

   }

   /**
    * Nested configuration if Jetty is being used.
    * 同tomcat的逻辑
    */
   @Configuration(proxyBeanMethods = false)
   @ConditionalOnClass({ Servlet.class, Server.class, Loader.class, WebAppContext.class })
   @ConditionalOnMissingBean(value = ServletWebServerFactory.class, search = SearchStrategy.CURRENT)
   static class EmbeddedJetty {

      @Bean
      JettyServletWebServerFactory JettyServletWebServerFactory(
            ObjectProvider<JettyServerCustomizer> serverCustomizers) {
         JettyServletWebServerFactory factory = new JettyServletWebServerFactory();
         factory.getServerCustomizers().addAll(serverCustomizers.orderedStream().collect(Collectors.toList()));
         return factory;
      }

   }

   /**
    * Nested configuration if Undertow is being used.
    * 同tomcat的逻辑
    */
   @Configuration(proxyBeanMethods = false)
   @ConditionalOnClass({ Servlet.class, Undertow.class, SslClientAuthMode.class })
   @ConditionalOnMissingBean(value = ServletWebServerFactory.class, search = SearchStrategy.CURRENT)
   static class EmbeddedUndertow {

      @Bean
      UndertowServletWebServerFactory undertowServletWebServerFactory(
            ObjectProvider<UndertowDeploymentInfoCustomizer> deploymentInfoCustomizers,
            ObjectProvider<UndertowBuilderCustomizer> builderCustomizers) {
         UndertowServletWebServerFactory factory = new UndertowServletWebServerFactory();
         factory.getDeploymentInfoCustomizers()
               .addAll(deploymentInfoCustomizers.orderedStream().collect(Collectors.toList()));
         factory.getBuilderCustomizers().addAll(builderCustomizers.orderedStream().collect(Collectors.toList()));
         return factory;
      }

   }

}
这里可以看到,配置类按照classpath中的类创建了不同的ServletWebServerFactory,本文这里加入了tomcat,所以这里将会创建TomcatServletWebServerFactory.
当然光看这个还是不行的,要明白为啥会这么创建,那么这一切要从springboot的启动流程开始分析才能解释整个情况.
四、SpringBoot启动流程分析
太阳底下无新鲜事,来揭开名为方便的面纱.当然这只是初步的探讨.
@EnableAutoConfiguration
public class Main {

    public static void main(String[] args) {
        SpringApplication.run(Main.class,args);
    }
}
熟悉springBoot的人看到这样的写法是否是感到平淡无奇?那么这短短的一行代码后面到底发生了啥??
4.1 SpringApplication.run
public static ConfigurableApplicationContext run(Class<?> primarySource, String... args) {
		return run(new Class<?>[] { primarySource }, args);
	}

	public static ConfigurableApplicationContext run(Class<?>[] primarySources, String[] args) {
		return new SpringApplication(primarySources).run(args);
	}
创建了个SpringApplication对象在run?看看构造函数是否有啥逻辑.
public SpringApplication(Class<?>... primarySources) {
		this(null, primarySources);
	}
public SpringApplication(ResourceLoader resourceLoader, Class<?>... primarySources) {
		this.resourceLoader = resourceLoader;
		Assert.notNull(primarySources, "PrimarySources must not be null");
		this.primarySources = new LinkedHashSet<>(Arrays.asList(primarySources));
		// 判断 web 应用的类型
		// 判断依据为 是否存在指定 DispatcherServlet,DispatcherHandler,ServletContainer,WebApplicationContext,ReactiveWebApplicationContext等类
		// 使用 class.forName 进行查找
  	// 判断spring程序的类型
		this.webApplicationType = WebApplicationType.deduceFromClasspath();
		// 加载 META-INF/spring.factories 配置文件,并把 ApplicationContextInitializer 相关的类全部实例化
		setInitializers((Collection) getSpringFactoriesInstances(ApplicationContextInitializer.class));
		// 加载 META-INF/spring.factories 配置文件,并把 ApplicationListener 相关的类 全部实例化
		setListeners((Collection) getSpringFactoriesInstances(ApplicationListener.class));
		// 检查 main 方法所在的类
		this.mainApplicationClass = deduceMainApplicationClass();
	}
在构造的时候还是做了不少的逻辑,这里就不得不提一下spring的黑魔法了,那就是SpringFactoriesLoader,这个东西有点像java中的spi机制,与之不同是spring是读取的是META-INF/spring.factories文件.至于为啥不用spi要自己单搞个,emmmmmm.
构造的逻辑很简单,不是很复杂,就是检测一下要启动什么类型的spring,具体操作是在WebApplicationType.deduceFromClasspath();,这个类型判断还是很重要的,后面创建spring上下文的时候会用得上.
4.2 springApplication.run
对象创建好了,又要继续run了.
public ConfigurableApplicationContext run(String... args) {
		// 创建一个用于记录 启动-关闭 时间的 StopWatch
		StopWatch stopWatch = new StopWatch();
		stopWatch.start();
		ConfigurableApplicationContext context = null;
		Collection<SpringBootExceptionReporter> exceptionReporters = new ArrayList<>();
		// 设置环境变量
		configureHeadlessProperty();
		// 创建 EventPublishingRunListener
		// 相当于是个组合模式,所有listener 都集中在 SpringApplicationRunListeners 中
		SpringApplicationRunListeners listeners = getRunListeners(args);
		// 启动容器,发送时间
		listeners.starting();
		try {
			// 把 args 封装为对象,映射到环境中
			ApplicationArguments applicationArguments = new DefaultApplicationArguments(args);
			// 初始化环境
			ConfigurableEnvironment environment = prepareEnvironment(listeners, applicationArguments);
			// 设置环境变量 spring.beaninfo.ignore
			configureIgnoreBeanInfo(environment);
			// 获取 需要打印的 Banner 并把 banner 打印到控制台
			Banner printedBanner = printBanner(environment);


			// 根据不同的类型 创建不同的上下文
			context = createApplicationContext();


			// 获取 所有 SpringBootExceptionReporter 相关的类
			exceptionReporters = getSpringFactoriesInstances(SpringBootExceptionReporter.class,
					new Class[] { ConfigurableApplicationContext.class }, context);
			// 准备上下文
			prepareContext(context, environment, listeners, applicationArguments, printedBanner);


			// 刷新上下文,发送事件
			refreshContext(context);


			// 模板方法
			afterRefresh(context, applicationArguments);
			// 停止
			stopWatch.stop();
			if (this.logStartupInfo) {
				new StartupInfoLogger(this.mainApplicationClass).logStarted(getApplicationLog(), stopWatch);
			}
			// 通知监听器,已经启动
			listeners.started(context);
			// 调用 runner的 run 方法
			callRunners(context, applicationArguments);
		}
		catch (Throwable ex) {
			// 处理运行时的错误
			handleRunFailure(context, ex, exceptionReporters, listeners);
			throw new IllegalStateException(ex);
		}

		try {
			// 通知监听器,正在运行
			listeners.running(context);
		}
		catch (Throwable ex) {
			// 处理运行时的错误
			handleRunFailure(context, ex, exceptionReporters, null);
			throw new IllegalStateException(ex);
		}
		// 返回上下文
		return context;
	}
由于本文不是分析代码的文章,所以关注点放在创建spring上下文和上下文的操作上.分别是createApplicationContext和refreshContext
4.3 createApplicationContext
protected ConfigurableApplicationContext createApplicationContext() {
		Class<?> contextClass = this.applicationContextClass;
		if (contextClass == null) {
			try {
				switch (this.webApplicationType) {
				case SERVLET:
					contextClass = Class.forName(DEFAULT_SERVLET_WEB_CONTEXT_CLASS);
					break;
				case REACTIVE:
					contextClass = Class.forName(DEFAULT_REACTIVE_WEB_CONTEXT_CLASS);
					break;
				default:
					contextClass = Class.forName(DEFAULT_CONTEXT_CLASS);
				}
			}
			catch (ClassNotFoundException ex) {
				throw new IllegalStateException(
						"Unable create a default ApplicationContext, please specify an ApplicationContextClass", ex);
			}
		}
		return (ConfigurableApplicationContext) BeanUtils.instantiateClass(contextClass);
	}
这里的类型,是按照之前构造方法中的类型进行创建的,如果不清楚的可以往上翻一哈.
- 如果类型为: SERVLET 就创建 AnnotationConfigServletWebServerApplicationContext
- 如果类型为: REACTIVE 就创建 AnnotationConfigReactiveWebServerApplicationContext
- 默认创建 : AnnotationConfigApplicationContext
很显然这里的类型是 SERVLET 所以创建了 AnnotationConfigServletWebServerApplicationContext,继承关系如下.
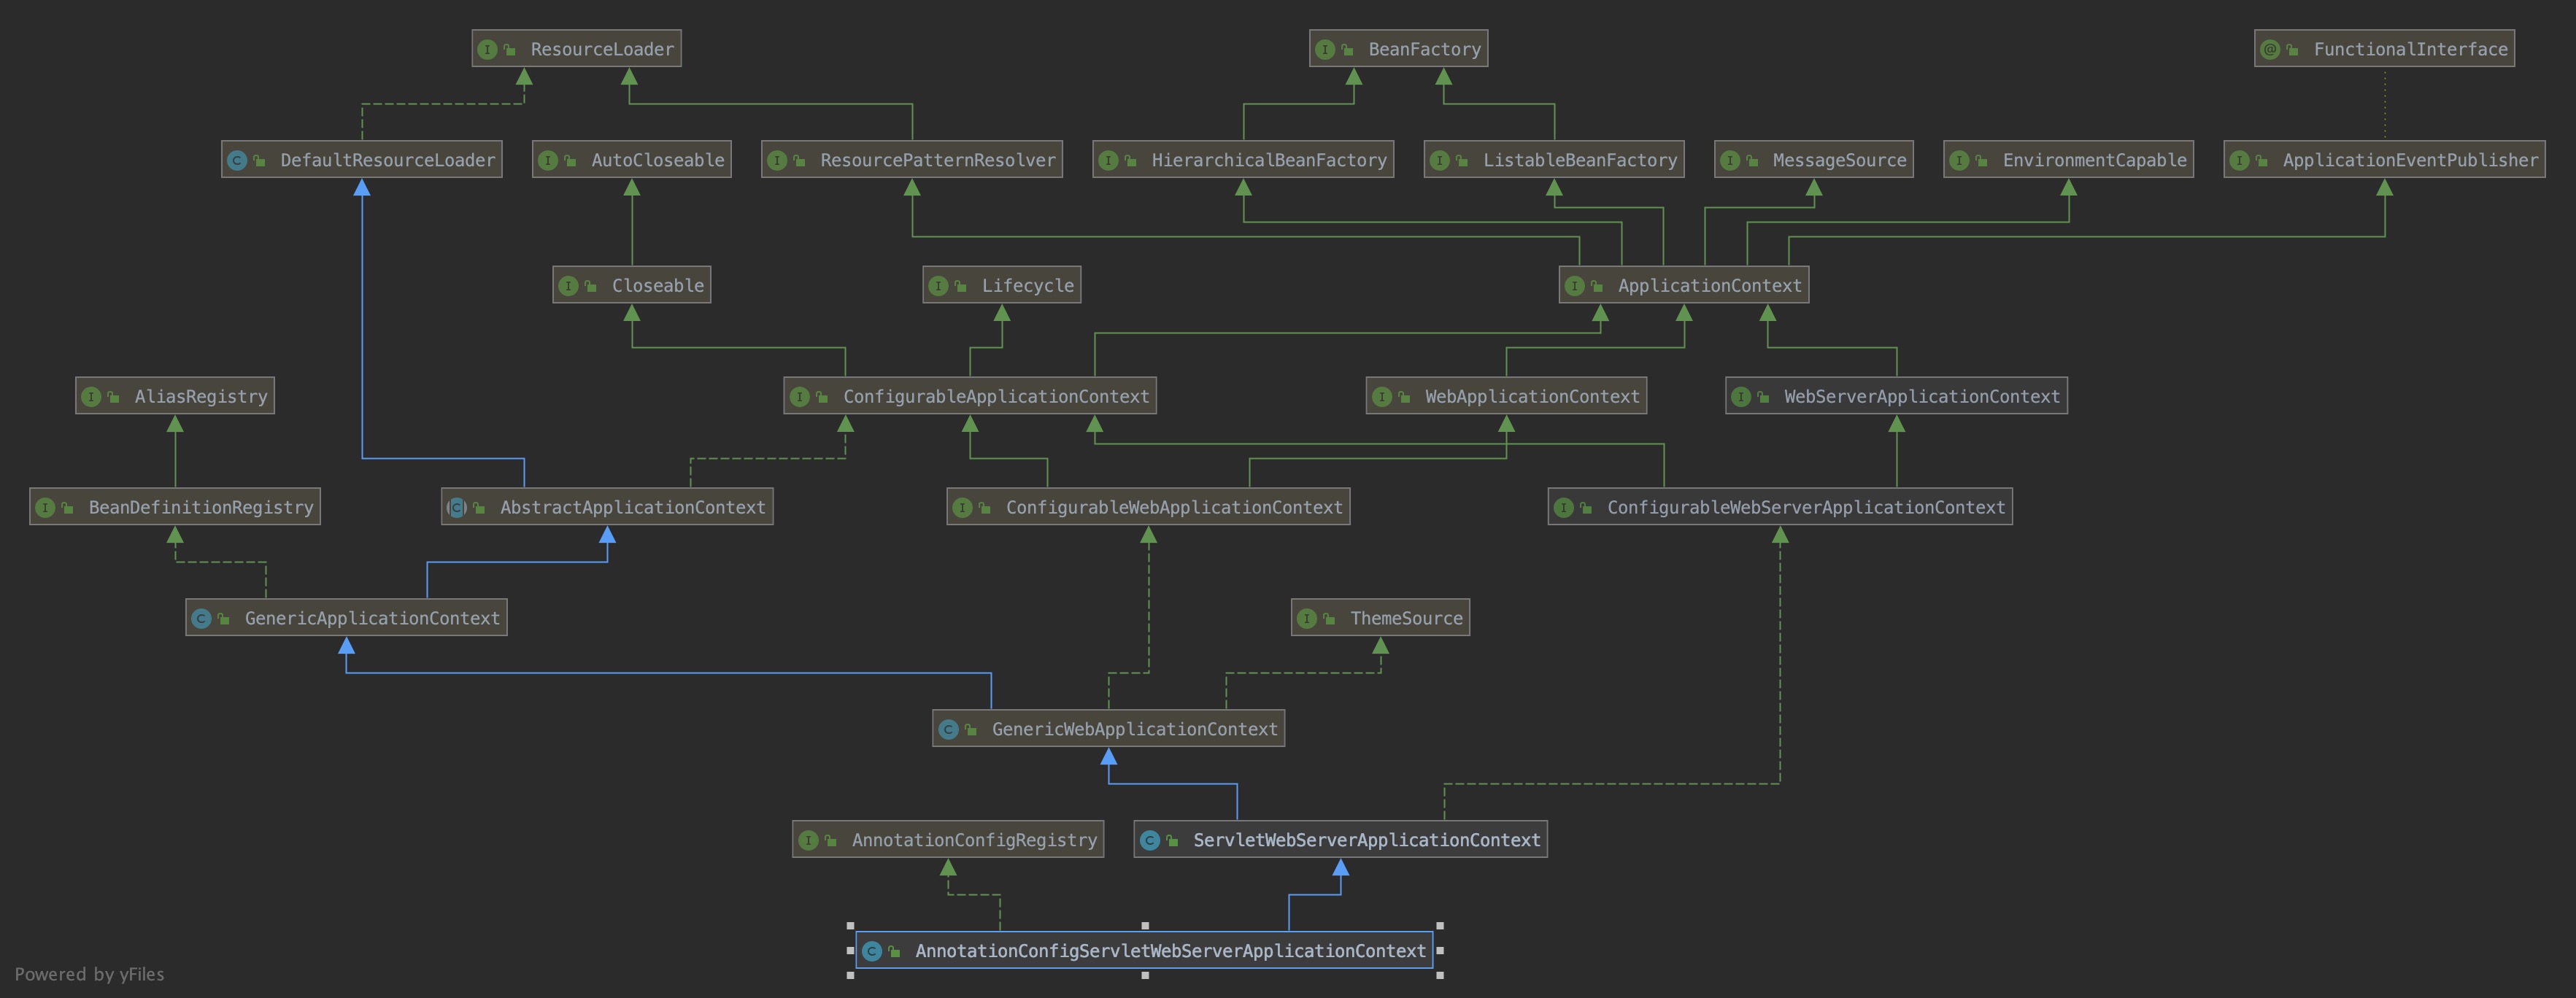
熟悉spring的同学是不是感觉与ClassPathXmlApplicationContext差不多?我觉得是差不多的,只是干事的方式有点区别.
这里把对象创建完了,然后进行一顿骚操作,设置值,环境等等.不再这里进行分析.要看的关键点是refreshContext.
4.5 refreshContext
刷新上下文,这里刷新会有什么骚操作呢?来瞧瞧就知道了.
private void refreshContext(ConfigurableApplicationContext context) {
		refresh((ApplicationContext) context);
		if (this.registerShutdownHook) {
			try {
				// 添加关闭钩子,关闭程序时,关闭上下文 释放资源
				context.registerShutdownHook();
			}
			catch (AccessControlException ex) {
				// Not allowed in some environments.
			}
		}
	}
添加钩子这个可以不用管,不影响逻辑.
@Deprecated
	protected void refresh(ApplicationContext applicationContext) {
		Assert.isInstanceOf(ConfigurableApplicationContext.class, applicationContext);
		refresh((ConfigurableApplicationContext) applicationContext);
	}
虽然这个方法过时,但spring还是没有直接删除,真够良心的,不像某Final,直接删,真TMSB.
protected void refresh(ConfigurableApplicationContext applicationContext) {
		applicationContext.refresh();
	}
注意这里的context 实际上是AnnotationConfigServletWebServerApplicationContext,而AnnotationConfigServletWebServerApplicationContext没有重写这个方法,是继承的它父类ServletWebServerApplicationContext.
// ServletWebServerApplicationContext
@Override
	public final void refresh() throws BeansException, IllegalStateException {
		try {
			super.refresh();
		}
		catch (RuntimeException ex) {
			stopAndReleaseWebServer();
			throw ex;
		}
	}
ServletWebServerApplicationContext的父类是AbstractApplicationContext
// AbstractApplicationContext
public void refresh() throws BeansException, IllegalStateException {
		synchronized (this.startupShutdownMonitor) {
			// Prepare this context for refreshing.
			// 准备刷新上下文环境
			prepareRefresh();

			// Tell the subclass to refresh the internal bean factory.
			// 初始化beanFactory,进行xml预读取
			ConfigurableListableBeanFactory beanFactory = obtainFreshBeanFactory();

			// Prepare the bean factory for use in this context.
			// 对beanFactory进行填充
			prepareBeanFactory(beanFactory);

			try {
				// Allows post-processing of the bean factory in context subclasses.
				// 子类覆盖方法做额外的处理
				postProcessBeanFactory(beanFactory);

				// Invoke factory processors registered as beans in the context.
				// 激活各种beanFactoryProcessors
				invokeBeanFactoryPostProcessors(beanFactory);

				// Register bean processors that intercept bean creation.
				//注册拦截bean创建的bean处理器
				registerBeanPostProcessors(beanFactory);

				// Initialize message source for this context.
				// 初始化上下文的消息源
				initMessageSource();

				// Initialize event multicaster for this context.
				// 初始化上下文的消息广播
				initApplicationEventMulticaster();

				// Initialize other special beans in specific context subclasses.
				// 留给子类来初始化其他的bean
				onRefresh();

				// Check for listener beans and register them.
				// 注册所有bean的监听器
				registerListeners();

				// Instantiate all remaining (non-lazy-init) singletons.
				// 初始化延迟加载的bean
				finishBeanFactoryInitialization(beanFactory);

				// Last step: publish corresponding event.
				// 最后一步,发布消息
				finishRefresh();
			}

			catch (BeansException ex) {
				if (logger.isWarnEnabled()) {
					logger.warn("Exception encountered during context initialization - " +
							"cancelling refresh attempt: " + ex);
				}
				//发生异常,销毁所有bean
				// Destroy already created singletons to avoid dangling resources.
				destroyBeans();

				// Reset 'active' flag.
				// 重置flag
				cancelRefresh(ex);

				// Propagate exception to caller.
				throw ex;
			}

			finally {
				// Reset common introspection caches in Spring's core, since we
				// might not ever need metadata for singleton beans anymore...
				// 重置缓存
				resetCommonCaches();
			}
		}
	}
这里的重点是onRefresh,这里onRefresh是由子类ServletWebServerApplicationContext进行实现的.
4.6 onRefresh
	// ServletWebServerApplicationContext
	@Override
	protected void onRefresh() {
		super.onRefresh();
		try {
		// 创建server
			createWebServer();
		}
		catch (Throwable ex) {
			throw new ApplicationContextException("Unable to start web server", ex);
		}
	}
终于绕到了创建 server 这里了,不知少侠是否还记得那个配置类??ServletWebServerFactoryConfiguration.那么现在才真正的开始了.
private void createWebServer() {
		WebServer webServer = this.webServer;
  	// 获取servlet 上下文
		ServletContext servletContext = getServletContext();
    // 如果 server 为空 或者 servlet上下文为空,就创建server
		if (webServer == null && servletContext == null) {
			ServletWebServerFactory factory = getWebServerFactory();
			this.webServer = factory.getWebServer(getSelfInitializer());
		}
		else if (servletContext != null) {
			try {
				getSelfInitializer().onStartup(servletContext);
			}
			catch (ServletException ex) {
				throw new ApplicationContextException("Cannot initialize servlet context", ex);
			}
		}
		initPropertySources();
	}
- 判断server是否创建
- 未创建就创建
- 初始化
- 初始化资源
这里的 getWebServerFactory() 方法从容器中获取的,容器里面的是之前配置类中创建的.
// 从容器中获取 ServletWebServerFactory
protected ServletWebServerFactory getWebServerFactory() {
		// Use bean names so that we don't consider the hierarchy
		String[] beanNames = getBeanFactory().getBeanNamesForType(ServletWebServerFactory.class);
		if (beanNames.length == 0) {
			throw new ApplicationContextException("Unable to start ServletWebServerApplicationContext due to missing "
					+ "ServletWebServerFactory bean.");
		}
		if (beanNames.length > 1) {
			throw new ApplicationContextException("Unable to start ServletWebServerApplicationContext due to multiple "
					+ "ServletWebServerFactory beans : " + StringUtils.arrayToCommaDelimitedString(beanNames));
		}
		return getBeanFactory().getBean(beanNames[0], ServletWebServerFactory.class);
	}
五、tomcat的创建
前面千辛万苦的获取到了 tomcatServer的工厂,接下来就看看是怎么创建的吧.
// TomcatServletWebServerFactory
@Override
	public WebServer getWebServer(ServletContextInitializer... initializers) {
		// .. 省略
    // 初始化
		prepareContext(tomcat.getHost(), initializers);
		return getTomcatWebServer(tomcat);
	}
这里ServletContextInitializer是不是和ServletContainerInitializer有点神似?别说不仔细看还是会看错,至于这两个是啥关系,这里就不琢磨了,毕竟这个不是重点.
5.1 初始化
// TomcatServletWebServerFactory
protected void prepareContext(Host host, ServletContextInitializer[] initializers) {
		//... 省略
  	// 添加监听器
		context.addLifecycleListener(new StaticResourceConfigurer(context));
		ServletContextInitializer[] initializersToUse = mergeInitializers(initializers);
		host.addChild(context);
		configureContext(context, initializersToUse);
		postProcessContext(context);
	}
在初始化过程中添加了一个名字为静态资源配置的监听器,名字都很怪怪的好吧.去看看这个监听器是干嘛的.
private final class StaticResourceConfigurer implements LifecycleListener {

		private final Context context;

		private StaticResourceConfigurer(Context context) {
			this.context = context;
		}

		@Override
		public void lifecycleEvent(LifecycleEvent event) {
      // 判断时机
			if (event.getType().equals(Lifecycle.CONFIGURE_START_EVENT)) {
				addResourceJars(getUrlsOfJarsWithMetaInfResources());
			}
		}

		private void addResourceJars(List<URL> resourceJarUrls) {
			for (URL url : resourceJarUrls) {
				String path = url.getPath();
				if (path.endsWith(".jar") || path.endsWith(".jar!/")) {
					String jar = url.toString();
					if (!jar.startsWith("jar:")) {
						// A jar file in the file system. Convert to Jar URL.
						jar = "jar:" + jar + "!/";
					}
					addResourceSet(jar);
				}
				else {
					addResourceSet(url.toString());
				}
			}
		}

		private void addResourceSet(String resource) {
			try {
				if (isInsideNestedJar(resource)) {
					// It's a nested jar but we now don't want the suffix because Tomcat
					// is going to try and locate it as a root URL (not the resource
					// inside it)
					resource = resource.substring(0, resource.length() - 2);
				}
				URL url = new URL(resource);
				String path = "/META-INF/resources";
				this.context.getResources().createWebResourceSet(ResourceSetType.RESOURCE_JAR, "/", url, path);
			}
			catch (Exception ex) {
				// Ignore (probably not a directory)
			}
		}

		private boolean isInsideNestedJar(String dir) {
			return dir.indexOf("!/") < dir.lastIndexOf("!/");
		}

	}
从这个监听器的代码逻辑上看 是往context.getResources丢东西呀.貌似是路径啥的,这会不会与开头的404问题有关呢?
createWebResourceSet这个方法嫌疑很大,去看看.
// StandardRoot
public void createWebResourceSet(ResourceSetType type, String webAppMount,
            String base, String archivePath, String internalPath) {
        List<WebResourceSet> resourceList;
        WebResourceSet resourceSet;

        switch (type) {
            case PRE:
                resourceList = preResources;
                break;
            case CLASSES_JAR:
                resourceList = classResources;
                break;
            case RESOURCE_JAR:
                resourceList = jarResources;
                break;
            case POST:
                resourceList = postResources;
                break;
            default:
                throw new IllegalArgumentException(
                        sm.getString("standardRoot.createUnknownType", type));
        }
					// ..... 省略
        resourceList.add(resourceSet);
    }
以上逻辑为根据不同的类型,往不同的list中添加路径.好吧还是看不出来这个到底有什么用,404的问题也没找到,不如果跟踪一下请求看看.
六、请求的跟踪
springMVC对请求的处理逻辑一般为 DispatcherServlet接管请求->查找handler->查找handlerDapter->视图解析器->解析视图->渲染视图.
虽然这个逻辑不不完善,可能还是错的,但差不多,笔者认为哈.
那么问题来了,在springMVC中的视图解析器是啥呢?看看ViewResolver的子类就知道是InternalResourceViewResolver了.但这个没啥用呀,因为具体的渲染逻辑是在视图对象里,解析器在这里没啥太大的用处.所以来看看jsp的视图JstlView中的操作吧.
public class JstlView extends InternalResourceView {

	@Nullable
	private MessageSource messageSource;


	/**
	 * Constructor for use as a bean.
	 * @see #setUrl
	 */
	public JstlView() {
	}

	/**
	 * Create a new JstlView with the given URL.
	 * @param url the URL to forward to
	 */
	public JstlView(String url) {
		super(url);
	}

	/**
	 * Create a new JstlView with the given URL.
	 * @param url the URL to forward to
	 * @param messageSource the MessageSource to expose to JSTL tags
	 * (will be wrapped with a JSTL-aware MessageSource that is aware of JSTL's
	 * {@code javax.servlet.jsp.jstl.fmt.localizationContext} context-param)
	 * @see JstlUtils#getJstlAwareMessageSource
	 */
	public JstlView(String url, MessageSource messageSource) {
		this(url);
		this.messageSource = messageSource;
	}


	/**
	 * Wraps the MessageSource with a JSTL-aware MessageSource that is aware
	 * of JSTL's {@code javax.servlet.jsp.jstl.fmt.localizationContext}
	 * context-param.
	 * @see JstlUtils#getJstlAwareMessageSource
	 */
	@Override
	protected void initServletContext(ServletContext servletContext) {
		if (this.messageSource != null) {
			this.messageSource = JstlUtils.getJstlAwareMessageSource(servletContext, this.messageSource);
		}
		super.initServletContext(servletContext);
	}

	/**
	 * Exposes a JSTL LocalizationContext for Spring's locale and MessageSource.
	 * @see JstlUtils#exposeLocalizationContext
	 */
	@Override
	protected void exposeHelpers(HttpServletRequest request) throws Exception {
		if (this.messageSource != null) {
			JstlUtils.exposeLocalizationContext(request, this.messageSource);
		}
		else {
			JstlUtils.exposeLocalizationContext(new RequestContext(request, getServletContext()));
		}
	}

}
在jstlView中并没有看到jsp的处理逻辑,去父类看看.
public class InternalResourceView extends AbstractUrlBasedView {
// 省略...

	/**
	 * Render the internal resource given the specified model.
	 * This includes setting the model as request attributes.
	 */
	@Override
	protected void renderMergedOutputModel(
			Map<String, Object> model, HttpServletRequest request, HttpServletResponse response) throws Exception {

		// Expose the model object as request attributes.
		exposeModelAsRequestAttributes(model, request);

		// Expose helpers as request attributes, if any.
		exposeHelpers(request);

		// Determine the path for the request dispatcher.
		String dispatcherPath = prepareForRendering(request, response);

		// Obtain a RequestDispatcher for the target resource (typically a JSP).
		RequestDispatcher rd = getRequestDispatcher(request, dispatcherPath);
		if (rd == null) {
			throw new ServletException("Could not get RequestDispatcher for [" + getUrl() +
					"]: Check that the corresponding file exists within your web application archive!");
		}

		// If already included or response already committed, perform include, else forward.
		if (useInclude(request, response)) {
			response.setContentType(getContentType());
			if (logger.isDebugEnabled()) {
				logger.debug("Including [" + getUrl() + "]");
			}
			rd.include(request, response);
		}

		else {
			// Note: The forwarded resource is supposed to determine the content type itself.
			if (logger.isDebugEnabled()) {
				logger.debug("Forwarding to [" + getUrl() + "]");
			}
			rd.forward(request, response);
		}
	}

  // 省略....

}
核心处理逻辑在renderMergedOutputModel,经过renderMergedOutputModel方法一顿骚操作以后,最后发现请求被RequestDispatcher接管了.emmm,线索又断了,那么最后是被谁接管的呢?在j2ee的世界里,能被啥接管?不就是个servlet或者filter嘛.
那么接下来要搞清楚是谁接管了请求,并渲染了jsp,虽然答案很显然了,但还是要走一下流程.
6.1 猜测是servlet接管了请求
springMVC 里 servlet?那不就是DispatcherServlet嘛?但总觉得不可能,不可能请求从DispatcherServlet来又回去吧?那就看看在创建tomcat的时候有没有注册其他的servelt.
// TomcatServletWebServerFactory
protected void prepareContext(Host host, ServletContextInitializer[] initializers) {
		// 省略 ..
		if (isRegisterDefaultServlet()) {
			addDefaultServlet(context);
		}

		if (shouldRegisterJspServlet()) {
			addJspServlet(context);
			addJasperInitializer(context);
		}
		// 省略	...
	}
可以看到在初始化的时候,注册了两个servlet,一个默认的servlet一个是jsp的servlet
// TomcatServletWebServerFactory
private void addDefaultServlet(Context context) {
		Wrapper defaultServlet = context.createWrapper();
		// 名称
		defaultServlet.setName("default");
		defaultServlet.setServletClass("org.apache.catalina.servlets.DefaultServlet");
		defaultServlet.addInitParameter("debug", "0");
		defaultServlet.addInitParameter("listings", "false");
		defaultServlet.setLoadOnStartup(1);
		// Otherwise the default location of a Spring DispatcherServlet cannot be set
  	// 是否运行覆盖,这是为了dispatcherServlet做准备
  	// 方便在后免把这个默认的servlet给覆盖掉
		defaultServlet.setOverridable(true);
		context.addChild(defaultServlet);
		context.addServletMappingDecoded("/", "default");
	}

	private void addJspServlet(Context context) {
		Wrapper jspServlet = context.createWrapper();
		jspServlet.setName("jsp");
		jspServlet.setServletClass(getJsp().getClassName());
		jspServlet.addInitParameter("fork", "false");
		getJsp().getInitParameters().forEach(jspServlet::addInitParameter);
		jspServlet.setLoadOnStartup(3);
		context.addChild(jspServlet);
    // 拦截 *.jsp 后缀的请求
		context.addServletMappingDecoded("*.jsp", "jsp");
		context.addServletMappingDecoded("*.jspx", "jsp");
	}
两个servlet,一个默认的,一个jsp的.看到这儿会不会有点奇怪,为啥不注册dispatcherServlet?emmm不是很明白昂,但是这个核心的servlet是不会落下的.
@AutoConfigureOrder(Ordered.HIGHEST_PRECEDENCE)
@Configuration(proxyBeanMethods = false)
/**
 * 匹配容器为 servlet
 * **/
@ConditionalOnWebApplication(type = Type.SERVLET)
/**
 * 判断 class path 路径下有 DispatcherServlet.class
 * **/
@ConditionalOnClass(DispatcherServlet.class)
/***
 * 在 ServletWebServerFactoryAutoConfiguration 之后生效
 * */
@AutoConfigureAfter(ServletWebServerFactoryAutoConfiguration.class)
public class DispatcherServletAutoConfiguration {

	/*
	 * The bean name for a DispatcherServlet that will be mapped to the root URL "/"
	 */
	public static final String DEFAULT_DISPATCHER_SERVLET_BEAN_NAME = "dispatcherServlet";

	/*
	 * The bean name for a ServletRegistrationBean for the DispatcherServlet "/"
	 */
	public static final String DEFAULT_DISPATCHER_SERVLET_REGISTRATION_BEAN_NAME = "dispatcherServletRegistration";

	@Configuration(proxyBeanMethods = false)
	@Conditional(DefaultDispatcherServletCondition.class)
	@ConditionalOnClass(ServletRegistration.class)
	// 启用配置 WebMvcProperties
	@EnableConfigurationProperties(WebMvcProperties.class)
	protected static class DispatcherServletConfiguration {

		@Bean(name = DEFAULT_DISPATCHER_SERVLET_BEAN_NAME)
		public DispatcherServlet dispatcherServlet(WebMvcProperties webMvcProperties) {
			DispatcherServlet dispatcherServlet = new DispatcherServlet();
			dispatcherServlet.setDispatchOptionsRequest(webMvcProperties.isDispatchOptionsRequest());
			dispatcherServlet.setDispatchTraceRequest(webMvcProperties.isDispatchTraceRequest());
			dispatcherServlet.setThrowExceptionIfNoHandlerFound(webMvcProperties.isThrowExceptionIfNoHandlerFound());
			dispatcherServlet.setPublishEvents(webMvcProperties.isPublishRequestHandledEvents());
			dispatcherServlet.setEnableLoggingRequestDetails(webMvcProperties.isLogRequestDetails());
			return dispatcherServlet;
		}

		@Bean
		@ConditionalOnBean(MultipartResolver.class)
		@ConditionalOnMissingBean(name = DispatcherServlet.MULTIPART_RESOLVER_BEAN_NAME)
		public MultipartResolver multipartResolver(MultipartResolver resolver) {
			// Detect if the user has created a MultipartResolver but named it incorrectly
			return resolver;
		}

	}

	@Configuration(proxyBeanMethods = false)
	@Conditional(DispatcherServletRegistrationCondition.class)
	@ConditionalOnClass(ServletRegistration.class)
	@EnableConfigurationProperties(WebMvcProperties.class)
	@Import(DispatcherServletConfiguration.class)
	protected static class DispatcherServletRegistrationConfiguration {

		@Bean(name = DEFAULT_DISPATCHER_SERVLET_REGISTRATION_BEAN_NAME)
		@ConditionalOnBean(value = DispatcherServlet.class, name = DEFAULT_DISPATCHER_SERVLET_BEAN_NAME)
		public DispatcherServletRegistrationBean dispatcherServletRegistration(DispatcherServlet dispatcherServlet,
				WebMvcProperties webMvcProperties, ObjectProvider<MultipartConfigElement> multipartConfig) {
			DispatcherServletRegistrationBean registration = new DispatcherServletRegistrationBean(dispatcherServlet,
					webMvcProperties.getServlet().getPath());
      // 名称
			registration.setName(DEFAULT_DISPATCHER_SERVLET_BEAN_NAME);
      // 启动顺序
			registration.setLoadOnStartup(webMvcProperties.getServlet().getLoadOnStartup());
			multipartConfig.ifAvailable(registration::setMultipartConfig);
			return registration;
		}

	}
  // 省略....

}
在自动配置的这个类里面生成了一个DispatcherServletRegistrationBean对象,这个对象就是用于组测dispatcherServlet的.DispatcherServletRegistrationBean是ServletContextInitializer的子类,用于初始化,注册等操作等.
那么这个对象是在什么时候注册的呢?又要回到tomcat创建的时候了.
// TomcatServletWebServerFactory
@Override
	public WebServer getWebServer(ServletContextInitializer... initializers) {
    // 省略..
		prepareContext(tomcat.getHost(), initializers);
		return getTomcatWebServer(tomcat);
	}
在调用初始化上下文的时候把这个玩意儿给传进去了.
// TomcatServletWebServerFactory
protected void prepareContext(Host host, ServletContextInitializer[] initializers) {
  // 省略...
		ServletContextInitializer[] initializersToUse = mergeInitializers(initializers);
		host.addChild(context);
		configureContext(context, initializersToUse);
		postProcessContext(context);
	}
这里合并了所有的ServletContextInitializer对象,传入到了configureContext方法中.
// TomcatServletWebServerFactory
protected void configureContext(Context context, ServletContextInitializer[] initializers) {
		TomcatStarter starter = new TomcatStarter(initializers);
		context.addServletContainerInitializer(starter, NO_CLASSES);

	}
这里把ServletContextInitializer转成了一个TomcatStarter对象,并把这个对象添加到了上下文中去.这个
TomcatStarter就厉害了.
class TomcatStarter implements ServletContainerInitializer {

	private static final Log logger = LogFactory.getLog(TomcatStarter.class);

	private final ServletContextInitializer[] initializers;

	private volatile Exception startUpException;

	TomcatStarter(ServletContextInitializer[] initializers) {
		this.initializers = initializers;
	}

	@Override
	public void onStartup(Set<Class<?>> classes, ServletContext servletContext) throws ServletException {
		try {
			// 初始化所有需要 初始化的类
			for (ServletContextInitializer initializer : this.initializers) {
				initializer.onStartup(servletContext);
			}
		}
		catch (Exception ex) {
			this.startUpException = ex;
			// Prevent Tomcat from logging and re-throwing when we know we can
			// deal with it in the main thread, but log for information here.
			if (logger.isErrorEnabled()) {
				logger.error("Error starting Tomcat context. Exception: " + ex.getClass().getName() + ". Message: "
						+ ex.getMessage());
			}
		}
	}

	Exception getStartUpException() {
		return this.startUpException;
	}

}
TomcatStarter实现了ServletContainerInitializer接口,这个接口就厉害了,在servlet的生命中期中,会调用实现这个接口的onStartup方法,至于什么是servlet的生命周期,就不引出了,估计一时半会也说不完.
嗯,知道这个东西的厉害,说了这么多,也没说ServletContextInitializer这个东西哪来的.不是方法传进来的嘛?不行就回去看看.
@Override
	public WebServer getWebServer(ServletContextInitializer... initializers) {
		// 省略...
		return getTomcatWebServer(tomcat);
	}
嗯,是传进来的,怎么传进来的?当然是创建的时候传的了0.0
// ServletWebServerApplicationContext
private void createWebServer() {
		WebServer webServer = this.webServer;
		ServletContext servletContext = getServletContext();
		if (webServer == null && servletContext == null) {
			ServletWebServerFactory factory = getWebServerFactory();
			this.webServer = factory.getWebServer(getSelfInitializer());
		}
		else if (servletContext != null) {
			try {
				getSelfInitializer().onStartup(servletContext);
			}
			catch (ServletException ex) {
				throw new ApplicationContextException("Cannot initialize servlet context", ex);
			}
		}
		initPropertySources();
	}
6.2 ServletContextInitializer 怎么来的
// 	ServletWebServerApplicationContext
private org.springframework.boot.web.servlet.ServletContextInitializer getSelfInitializer() {
		return this::selfInitialize;
	}

	private void selfInitialize(ServletContext servletContext) throws ServletException {
		prepareWebApplicationContext(servletContext);
		registerApplicationScope(servletContext);
		WebApplicationContextUtils.registerEnvironmentBeans(getBeanFactory(), servletContext);
		for (ServletContextInitializer beans : getServletContextInitializerBeans()) {
			beans.onStartup(servletContext);
		}
	}
这就是了,那配置类DispatcherServletAutoConfiguration里面的DispatcherServletRegistrationBean哪去了?这里的确没有,不过在getServletContextInitializerBeans()方法返回的集合里面.
// ServletWebServerApplicationContext
protected Collection<ServletContextInitializer> getServletContextInitializerBeans() {
		return new ServletContextInitializerBeans(getBeanFactory());
	}
ServletContextInitializerBeans是一个继承了AbstractCollection的集合对象.
// ServletContextInitializerBeans
public ServletContextInitializerBeans(ListableBeanFactory beanFactory,
			Class<? extends ServletContextInitializer>... initializerTypes) {
		this.initializers = new LinkedMultiValueMap<>();
		this.initializerTypes = (initializerTypes.length != 0) ? Arrays.asList(initializerTypes)
				: Collections.singletonList(ServletContextInitializer.class);
		addServletContextInitializerBeans(beanFactory);
		addAdaptableBeans(beanFactory);
		List<ServletContextInitializer> sortedInitializers = this.initializers.values().stream()
				.flatMap((value) -> value.stream().sorted(AnnotationAwareOrderComparator.INSTANCE))
				.collect(Collectors.toList());
		this.sortedList = Collections.unmodifiableList(sortedInitializers);
		logMappings(this.initializers);
	}
核心逻辑就在构造方法中的addServletContextInitializerBeans方法中.
// ServletContextInitializerBeans
private void addServletContextInitializerBeans(ListableBeanFactory beanFactory) {
		for (Class<? extends ServletContextInitializer> initializerType : this.initializerTypes) {
			for (Entry<String, ? extends ServletContextInitializer> initializerBean : getOrderedBeansOfType(beanFactory,
					initializerType)) {
				addServletContextInitializerBean(initializerBean.getKey(), initializerBean.getValue(), beanFactory);
			}
		}
	}

	private <T> List<Entry<String, T>> getOrderedBeansOfType(ListableBeanFactory beanFactory, Class<T> type) {
		return getOrderedBeansOfType(beanFactory, type, Collections.emptySet());
	}
	private <T> List<Entry<String, T>> getOrderedBeansOfType(ListableBeanFactory beanFactory, Class<T> type,
			Set<?> excludes) {
		String[] names = beanFactory.getBeanNamesForType(type, true, false);
		Map<String, T> map = new LinkedHashMap<>();
		for (String name : names) {
			if (!excludes.contains(name) && !ScopedProxyUtils.isScopedTarget(name)) {
				T bean = beanFactory.getBean(name, type);
				if (!excludes.contains(bean)) {
					map.put(name, bean);
				}
			}
		}
		List<Entry<String, T>> beans = new ArrayList<>(map.entrySet());
		beans.sort((o1, o2) -> AnnotationAwareOrderComparator.INSTANCE.compare(o1.getValue(), o2.getValue()));
		return beans;
	}
从ioc中获取所有ServletContextInitialize的子类,而这个bean就刚好是之前配置类中的bean,DispatcherServletRegistrationBean.
至于注册的逻辑就不阐述了,很简单,顺着DispatcherServletRegistrationBean的父类RegistrationBean看下去就好.
七、整理线索
前面说了那么多跟404完全没有关系呀,其实前面是在做铺垫而已,看官别着急.由前文的逻辑可以知道在tomcat里面至少注册了2个servetl,一个是spring的(后面覆盖的),一个是jsp的.那么完全由理由猜测,最后由JstlView转发的请求到了jspServlet里面.来看看jspSerlvet里面干了啥?
 // JspServlet
 public void service (HttpServletRequest request, HttpServletResponse response)
            throws ServletException, IOException {

       	// 省略....

        try {
            serviceJspFile(request, response, jspUri, precompile);
        } catch (RuntimeException e) {
            throw e;
        } catch (ServletException e) {
            throw e;
        } catch (IOException e) {
            throw e;
        } catch (Throwable e) {
            ExceptionUtils.handleThrowable(e);
            throw new ServletException(e);
        }

    }
别问我为啥只贴了service这个方法.先看看第一个方法serviceJspFile.
// JspServlet
private void serviceJspFile(HttpServletRequest request,
                                HttpServletResponse response, String jspUri,
                                boolean precompile)
        throws ServletException, IOException {

        JspServletWrapper wrapper = rctxt.getWrapper(jspUri);
        if (wrapper == null) {
            synchronized(this) {
                wrapper = rctxt.getWrapper(jspUri);
                if (wrapper == null) {
                    // Check if the requested JSP page exists, to avoid
                    // creating unnecessary directories and files.
                  	// 判断 jsp 文件是否存在
                    if (null == context.getResource(jspUri)) {
                        handleMissingResource(request, response, jspUri);
                        return;
                    }
                    wrapper = new JspServletWrapper(config, options, jspUri,
                                                    rctxt);
                    rctxt.addWrapper(jspUri,wrapper);
                }
            }
        }

        try {
            wrapper.service(request, response, precompile);
        } catch (FileNotFoundException fnfe) {
            handleMissingResource(request, response, jspUri);
        }

    }
诺,核心代码被抓了.这个SerlvetContext,既然在tomcat里面那么它的实现类肯定是ApplicationContext,不用怀疑,不信你跟跟流程看看.
既然是ApplicationContext中获取资源,那来看看是怎么拿的文件吧.
//  ApplicationContext
public URL getResource(String path) throws MalformedURLException {

      	// 省略...
        WebResourceRoot resources = context.getResources();
        if (resources != null) {
          	// 获取资源
            return resources.getResource(validatedPath).getURL();
        }

        return null;
    }
转战到 WebResourceRoot里去,WebResourceRoot是个接口,在本案例中的唯一子类是StandardRoot.
// StandardRoot
@Override
    public WebResource getResource(String path) {
        return getResource(path, true, false);
    }

    protected WebResource getResource(String path, boolean validate,
            boolean useClassLoaderResources) {
        if (validate) {
            path = validate(path);
        }
				// 判断是否允许缓存,这个默认值是true
        if (isCachingAllowed()) {
            return cache.getResource(path, useClassLoaderResources);
        } else {
            return getResourceInternal(path, useClassLoaderResources);
        }
    }
这里分两种情况,一个是从换成里面获取,另外则从非缓存中获取,缓存里面的世界很精彩的.
7.1 从缓存里面获取
// Cache
protected WebResource getResource(String path, boolean useClassLoaderResources) {

  	// 省略....
		// 判断是否获取到缓存
    if (cacheEntry == null) {
        // Local copy to ensure consistency
        int objectMaxSizeBytes = getObjectMaxSizeBytes();
      	// 创建缓存对象
        CachedResource newCacheEntry = new CachedResource(this, root, path, getTtl(),
                objectMaxSizeBytes, useClassLoaderResources);

        // Concurrent callers will end up with the same CachedResource
        // instance
      	// 放入缓存中
        cacheEntry = resourceCache.putIfAbsent(path, newCacheEntry);
				// 二次判断
        if (cacheEntry == null) {
            // newCacheEntry was inserted into the cache - validate it
            cacheEntry = newCacheEntry;
          	// 验证资源的合法性(这里就石锤了)
            cacheEntry.validateResource(useClassLoaderResources);
		// 省略....

    return cacheEntry;
}
还差2步
// CachedResource
protected boolean validateResource(boolean useClassLoaderResources) {
       // 省略..
  			// 非空检查
        if (webResource == null) {
          	// 加锁
            synchronized (this) {
              	// 双重检查
                if (webResource == null) {
                    webResource = root.getResourceInternal(
                            webAppPath, useClassLoaderResources);
                    getLastModified();
                    getContentLength();
                    nextCheck = ttl + now;
                    // exists() is a relatively expensive check for a file so
                    // use the fact that we know if it exists at this point
                    if (webResource instanceof EmptyResource) {
                        cachedExists = Boolean.FALSE;
                    } else {
                        cachedExists = Boolean.TRUE;
                    }
                    return true;
                }
            }
        }
}
程序初次允许的时候,webResource肯定是为空的,别说缓存了.这里的root是StandardRoot,又调用回去了.
// StandardRoot

 private final List<List<WebResourceSet>> allResources =
            new ArrayList<>();
    {
        allResources.add(preResources);
        allResources.add(mainResources);
        allResources.add(classResources);
        allResources.add(jarResources);
        allResources.add(postResources);
    }

protected final WebResource getResourceInternal(String path,
            boolean useClassLoaderResources) {
        WebResource result = null;
        WebResource virtual = null;
        WebResource mainEmpty = null;
        for (List<WebResourceSet> list : allResources) {
            for (WebResourceSet webResourceSet : list) {
                if (!useClassLoaderResources &&  !webResourceSet.getClassLoaderOnly() ||
                        useClassLoaderResources && !webResourceSet.getStaticOnly()) {
                    result = webResourceSet.getResource(path);
                    if (result.exists()) {
                        return result;
                    }
                    if (virtual == null) {
                        if (result.isVirtual()) {
                            virtual = result;
                        } else if (main.equals(webResourceSet)) {
                            mainEmpty = result;
                        }
                    }
                }
            }
        }
				// 省略...
        // Default is empty resource in main resources
        return mainEmpty;
    }
这里遍历不同资源类别,来判断文件是否存在,如果存在就返回,然后放入缓存中.至于从非缓存中获取的逻辑就上面getResourceInternal的逻辑,就不罗嗦了.
嗯,这个有啥用呢?还是未解决404的问题呀,别急快了.
八、被遗忘的静态资源监听器(StaticResourceConfigurer)
少侠是否记得在创建tomcat的时候在servletContext中添加了个这个监听器呢?
// TomcatServletWebServerFactory
protected void prepareContext(Host host, ServletContextInitializer[] initializers) {
		// 省略...
		context.addLifecycleListener(new StaticResourceConfigurer(context));
		// 省略...
	}
再来看看这个监听器的逻辑吧.
// TomcatServletWebServerFactory$StaticResourceConfigurer
private final class StaticResourceConfigurer implements LifecycleListener {

		private final Context context;

		private StaticResourceConfigurer(Context context) {
			this.context = context;
		}

		@Override
		public void lifecycleEvent(LifecycleEvent event) {
			if (event.getType().equals(Lifecycle.CONFIGURE_START_EVENT)) {
				addResourceJars(getUrlsOfJarsWithMetaInfResources());
			}
		}

		private void addResourceJars(List<URL> resourceJarUrls) {
			for (URL url : resourceJarUrls) {
				String path = url.getPath();
				if (path.endsWith(".jar") || path.endsWith(".jar!/")) {
					String jar = url.toString();
					if (!jar.startsWith("jar:")) {
						// A jar file in the file system. Convert to Jar URL.
						jar = "jar:" + jar + "!/";
					}
					addResourceSet(jar);
				}
				else {
					addResourceSet(url.toString());
				}
			}
		}

		private void addResourceSet(String resource) {
			try {
				if (isInsideNestedJar(resource)) {
					// It's a nested jar but we now don't want the suffix because Tomcat
					// is going to try and locate it as a root URL (not the resource
					// inside it)
					resource = resource.substring(0, resource.length() - 2);
				}
				URL url = new URL(resource);
				String path = "/META-INF/resources";
				this.context.getResources().createWebResourceSet(ResourceSetType.RESOURCE_JAR, "/", url, path);
			}
			catch (Exception ex) {
				// Ignore (probably not a directory)
			}
		}

		private boolean isInsideNestedJar(String dir) {
			return dir.indexOf("!/") < dir.lastIndexOf("!/");
		}

	}
无论逻辑怎么变化,最后监听器的代码都会走到this.context.getResources().createWebResourceSet(ResourceSetType.RESOURCE_JAR, "/", url, path);这句话来.
看到ResourceSetType.RESOURCE_JAR这个常量是否有点感觉呢?没感觉就脱掉衣服再看看.
// StandardRoot
public void createWebResourceSet(ResourceSetType type, String webAppMount,
            URL url, String internalPath) {
        BaseLocation baseLocation = new BaseLocation(url);
        createWebResourceSet(type, webAppMount, baseLocation.getBasePath(),
                baseLocation.getArchivePath(), internalPath);
    }

    @Override
    public void createWebResourceSet(ResourceSetType type, String webAppMount,
            String base, String archivePath, String internalPath) {
        List<WebResourceSet> resourceList;
        WebResourceSet resourceSet;

        switch (type) {
            case PRE:
                resourceList = preResources;
                break;
            case CLASSES_JAR:
                resourceList = classResources;
                break;
            case RESOURCE_JAR:
                resourceList = jarResources;
                break;
            case POST:
                resourceList = postResources;
                break;
            default:
                throw new IllegalArgumentException(
                        sm.getString("standardRoot.createUnknownType", type));
        }
      	// 省略
        resourceList.add(resourceSet);
    }
是不是这一切都园回去了?是不是感觉疑惑都没了?如果还是不解在去看看资源解析的那块儿.
九、真相
为甚么是404呢?那是因为在StandardRoot里面的resourceList中不存在指定的根路径,所以是404.又要有小伙伴要杠了,说MATE-INFO目录下面的都没问题.
是,没问题.因为springBoot把这个路径加进去了.不信你看.
// StaticResourceConfigurer
private final class StaticResourceConfigurer implements LifecycleListener {

		private final Context context;

		private StaticResourceConfigurer(Context context) {
			this.context = context;
		}

		@Override
		public void lifecycleEvent(LifecycleEvent event) {
			if (event.getType().equals(Lifecycle.CONFIGURE_START_EVENT)) {
				addResourceJars(getUrlsOfJarsWithMetaInfResources());
			}
		}

		private void addResourceJars(List<URL> resourceJarUrls) {
			// 省略
		}

		private void addResourceSet(String resource) {
			// 省略
		}

		private boolean isInsideNestedJar(String dir) {
			return dir.indexOf("!/") < dir.lastIndexOf("!/");
		}

	}
在getUrlsOfJarsWithMetaInfResources方法里面就有这个路径.逻辑简单就不贴出来了.
9.1 如何解决404
根据以上的分析,可以和spring一样弄个监听器,在resourceList添加指定的路径.最简单暴力的方法如下:
@Controller
@EnableAutoConfiguration
@Configuration
public class Main {

    public static void main(String[] args) {
        SpringApplication.run(Main.class,args);
    }

    @RequestMapping("/test-static")
    public String testStatic(){
        return "index-static";
    }

    @RequestMapping("/test-public")
    public String testPublic(){
        return "index-public";
    }

    @RequestMapping("/test-resources")
    public String testResources(){
        return "index-resources";
    }

    @RequestMapping("/test-meta")
    public String testMeta(){
        return "index-meta";
    }

    @Bean
    public TomcatServletWebServerFactory getTomcatServletWebServerFactory(){
        return new AdvTomcatServletWebServerFactory();
    }

}
自定义工厂:
public class AdvTomcatServletWebServerFactory extends TomcatServletWebServerFactory {

    private Context context;

    public AdvTomcatServletWebServerFactory(){
        getContextLifecycleListeners().add(new AdvResourceListener());
    }
		// 这个方法是 spring留下的模板方法
  	// 可以通过这个方法进行扩展
    @Override
    protected void postProcessContext(Context context) {
        this.context = context;
    }

    private  class AdvResourceListener implements LifecycleListener{

        @Override
        public void lifecycleEvent(LifecycleEvent event) {
            if (event.getType().equals(Lifecycle.CONFIGURE_START_EVENT)) {
                final URL resource = AdvTomcatServletWebServerFactory.class.getClassLoader().getResource(".");
                final WebResourceRoot resources = AdvTomcatServletWebServerFactory.this.context.getResources();
                resources.createWebResourceSet(WebResourceRoot.ResourceSetType.RESOURCE_JAR, "/", resource, "/static");
                resources.createWebResourceSet(WebResourceRoot.ResourceSetType.RESOURCE_JAR, "/", resource, "/public");
                resources.createWebResourceSet(WebResourceRoot.ResourceSetType.RESOURCE_JAR, "/", resource, "/resources");
            }

        }
    }
}
通过自己的工厂替换掉spring的工厂,实现注册自己的监听器,当然方法还有很多,如果你熟悉tomcat的启动流程的话.
十、小结
在springBoot的懒人套餐下,出现问题往往会让人防不胜防呀,比如这个404,根本没有任何信息说哪里有问题(除非是开了debug日志).
本来就想谢谢解决方案的,结果写了这么多,吃饭了.